
Self-Acceptance and a Viscose Penny Dress
I recently made up the Sew Over It Penny Dress and fell in love with the style even though it was quite different to anything I had ever worn before and I knew I wanted to make a couple more. It’s one of those dresses that looks as good for a casual weekend as it does the office and the styling potentials are many.
Sewing & Body Acceptance
Viscose garments were not a part of my wardrobe until I took up sewing. Light and floaty fabrics making up garments that skimmed loosely over my body were not something I thought looked good on me. Having been sewing now for eighteen months, I’ve realised that me being a plus size girl was not the problem – although, I always blamed myself when things never looked as good on me as they did on the models on the website. I blamed myself for not being 5’10 and a size 8. My body was the failure. Sewing has taught me that the opposite is true. The problem never was my body; the problem was the fashion industry which didn’t use realistic models to show off their products, let alone draft their garments to suit real body types. Added to the poor drafting and fit was that the garments were made with profit in mind so used inexpensive fabrics and the finish was rarely as good as the garments I make now.
With sewing, out came the tape measure and good quality fabrics. I no longer had to try on clothes to find what size I was or avoid trying on clothes to discover they looked awful on me. With sewing, I was finally in a place where I accepted the reality of my curves. This is the happiness you achieve by picking up a needle and thread – you no longer judge yourself by the accepted set of measurements that govern the high street so inconsistently.
When people ask me why I sew, I have a simple answer. Yes, I do it because I am aiming to live more sustainably, because I enjoy it, because I love the learning… but more than that: you don’t reject your body when you sew.
Sewing means learning to work with your body – the option of rejecting it is off the table and you learn to embrace it. You look at your body objectively – instead of judging how your body looks, you start assessing how shapes can match your body and how to adjust them if they don’t. It turns out I didn’t really hate this kind of floating, body skimming garment. I hated the fact they were so badly made that, even if I was taller or thinner, I’d probably have disliked the look of them just as much. When sewing your own clothes, you no longer have to fit a retailer’s tick box. Every one of us have a unique, exclusive body so why not treat it that way and dress it instead of trying to make it fit the poor standards of standardisation.
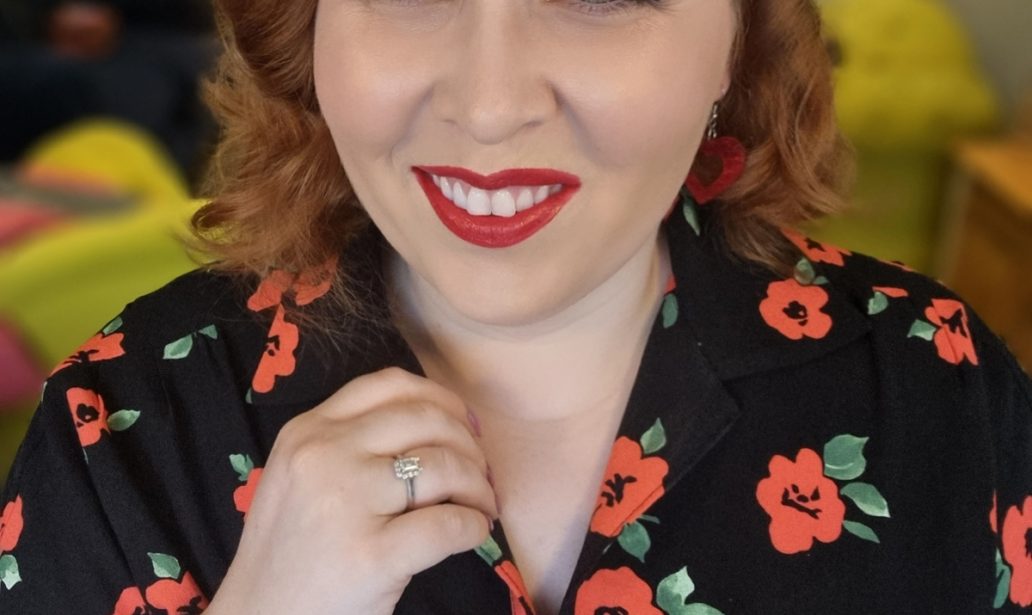
Making the Penny Dress
It is no secret that I love Sew Over It patterns; more specifically the vintage inspired patterns. Once I get the fit right, I’ll make them again and again. Penny is no exception to that rule with a huge bonus being that it is a pattern that does not really need toiled because of the style of it. I am a dressmaking D cup and following my high bust measurement to choose a size was perfect for me. Obviously, if you do have a dramatically fuller bust this might not be the case. The other measurement worth paying attention to is the bodice length to get the waist point correct. For this reason, I’d consider this a perfect beginner patter.
Penny had been on my to make list for quite a long time but because of my RTW experience as related above I didn’t prioritise it but I am so glad I got around to wearing it. I used to put a lot of weight in the old adage that loose garments looked like sacks on curvier girls; how untrue is that. Poorly fitted garments look like sacks on curvier and slender girls alike!
I am also rediscovering an old love for a collared dress and, with autumn coming in, Penny is a beautiful layering piece and work appropriate, too.

The construction of the dress is pretty simple – as with all the Sew Over It patterns, the instructions are well-written and easy to follow. There are a lot of cute features on this dress, not just the collar. Penny features a button-up bodice with a dropped shoulder (which speeds up the sewing process), an easy-fit elasticated waist which gathers up the full circle skirt. For me, it is perfectly ‘modern vintage’, both contemporary and classic.
The elasticated waist makes this a really comfortable garment to wear; I discovered – after making it, of course – that it’s easy to get on over your head and you could skip the buttonholes (however, I quite enjoy the process of sewing buttonholes). It makes it even more beginner friendly, though, if you want to skip the buttonholes and just stitch the buttons on through both sides of the placket.

Another feature I love about this dress is the grown-on sleeves – I think the sleeves, along with the gathers in the skirt, really ask to be made in drapier fabrics such as this viscose. A cotton lawn would work but you’d get a crisper sleeve (and I prefer the fluidity) and maybe a little too much bulk at the waistline. Viscose definitely gives this dress a softer, more romantic feel.

If, like me, you’re embracing viscose, here are five more tried and tested patterns I would recommend trying if you haven’t done so before.

Sew Over It Marguerite (top left)
Chalk and Notch Fringe (bottom left)
Closet Core Patterns Elodie (centre)
By Hand London Hannah (top right)
Violette Field Threads Ashton (bottom right)
My Top 5 Tips for Sewing with Viscose
- Prewash your fabric
I’m not going to lie; my heart sinks a little every time I hear someone say they couldn’t be bothered prewashing their fabric. Viscose shrinks by approximately 5% so it’s worthwhile prewashing your garment so you don’t undo all the work you did in fitting the garment.
- Use pattern weights and a rotary cutter
Because viscose is likely to slip and shift you want to make sure to reduce this – you could use pins but they can snag your viscose so pattern weights are a better option. Be careful even when pinning your fabric and only use pins in the seam allowances. To stop the fabric from moving around too much, a rotary will give you more control and less distortion by keeping the fabric flat.
- Stay stitch
If there is one thing you take away from these tips, let it be this – stay stitching is not optional. In fact, even when a pattern doesn’t tell me to stay stitch, I do it anyhow. Viscose is very likely to warp and stretch so to make your sewing as enjoyable as possible, stay stitch your edges. A lot of patterns skip this step or only recommend it for necklines but I do it for all my edges, especially arm holes.
- Use a sharp needle
Again, the importance of this cannot be overstated. I change my needle for every project and sometimes in the middle of a project. If you ever get fabric being sucked into the plate, it is most likely to be the fault of the needle which has dulled and is actually pushing the fabric down into it! I usually choose a 70/10 needle when sewing with viscose, although you can’t go wrong with a microtex. A sharp needle is also incredibly important for edge-stitching.
- Allow your fabric to drop before hemming
I know when you get to the point of hemming the last thing you want to do is put off finishing your project but viscose fabric will drop a lot and never evenly. I always leave a minimum of 24 hours before hemming but preferable 48 hours. Then try the garment on and decide where you want it to sit before measuring the hem (this is one of the reasons I love my dressmaking form) to even it all round. When I trimmed the hem on my Penny, the material cut off varied from 2 – 5.5 inches. Would you really rather finish a project quickly or wait a couple of days to do it right?
Hopefully these tips will be useful to you if you don’t have a lot of experience with viscose.
Thank you for reading.
Happy stitching!
Mary-Ellen x